

7 Detailed Installation Guides for Common Instrument Piping Fittings
2026-06-12 12:597 Detailed Installation Guides for Common Instrument Piping Fittings
Instrument piping fittings may appear small and unassuming, but when they fail, the problems can be difficult to resolve. On-site piping installations frequently encounter such issues: no abnormalities after initial installation, yet leakage occurs once pressure is applied; no leaks under low pressure, but seepage begins as pressure increases; or during maintenance, tightening seems to fix the issue temporarily, only for oil stains, bubbles, or medium crystallization to reappear after a few days of operation.
Most people immediately suspect poor fitting quality, but experienced field technicians know that most instrument piping leaks are not caused by damaged fittings themselves, but rather by improper selection, incorrect thread pairing, misalignment in compression fitting installation, irregular pipe end preparation, or insufficient tightening turns—small oversights that accumulate into long-term leakage risks.
I. Don’t Mix and Match Fittings Just Because They Look Similar
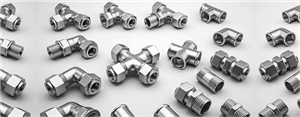
Common instrument piping fittings fall into seven main categories, each with distinct functions:
1. Straight Couplings: Used for direct connections between two straight sections of pipe, widely used on site.
2. Elbow Couplings: Designed for pipe bends, commonly used at 90-degree turns.
3. Tee Couplings: Enable branching of one pipeline, often used in pressure tapping lines, sampling lines, and instrument branch connections.
4. Union Couplings with Adjustable Nuts: Suitable for locations requiring frequent disassembly, angle adjustment, or later maintenance.
5. Reducer Couplings: Facilitate transitions between pipes of different sizes, thread types, or connection styles.
6. Plugs: Used to seal unused pipe ends.
7. Reducing Couplings: Connect pipes of different diameters.
Although these fittings look similar, they must never be interchanged arbitrarily. Differences exist in pressure ratings, sealing methods, thread standards, materials, and compatible media. Instrument piping systems often involve pressure, temperature, corrosive media, and safety interlock systems. A wrong fitting choice—even if repeatedly tightened—can only temporarily mask leakage issues.
II. Being Able to Screw It In Doesn't Mean It's Properly Installed
Threads are one of the most common failure points in instrument piping fittings. Common thread types include metric, NPT, BSP, G, R, Rc, among others. You don’t need to memorize all names, but you must understand: just because threads engage doesn’t mean they meet standard specifications.
Some threads rely on their own form for sealing, others depend on face sealing, while some require gaskets, O-rings, or metal sealing surfaces. Different sealing mechanisms demand different installation procedures. Never assume compatibility simply because the threads “fit” a few turns. In practice, it’s common to initially engage threads smoothly, then experience resistance during tightening, ultimately damaging thread profiles or sealing surfaces and rendering the fitting unusable.
Teflon tape should also be used judiciously. Conical threads may use sealing tape or sealant in appropriate applications, but face-sealed, O-ring sealed structures—or fittings explicitly prohibited from using tape by manufacturers—should never have tape wrapped around them. Loose debris from the tape can enter the instrument piping system and clog small passages such as valve assemblies or pressure transmitters.
Before installation, always verify three key points: thread size compatibility, distinction between conical and parallel threads, and confirmation of sealing structure and location.
III. Compression Fittings Aren’t About "Tightening Harder"
Compression fittings are extremely common in instrument piping systems, yet many people mistakenly believe that tighter equals better sealing—a misconception. The reliability of compression fittings depends on precise alignment between the ferrule, tube, and fitting body, not brute force.
Standard compression fittings typically consist of a body, nut, front and rear ferrules, and tubing. Variants include single-ferrule designs and cut rings. During tightening, the front ferrule seals against the body's sealing surface while also forming a seal with the outer wall of the tube; the rear ferrule or cutting ring grips the tube securely to prevent loosening under pressure, vibration, or external forces. The key points in ferrule installation are ensuring proper insertion of the tube, correct ferrule orientation, and appropriate number of tightening turns—avoiding over-tightening at all costs.
IV. On-site Installation: Focus on These Steps 1.
The pipe cut ends must be flat and free from oblique cuts, flattening, or oval deformation. Pipes cut hastily, even if joined, will result in uneven stress distribution on the fittings. Although initial pressurization may show no leakage, long-term operation under vibration and temperature fluctuations can easily lead to leaks. 2.
Thoroughly remove burrs and metal debris. After cutting, burrs form on both the inner and outer ends of the tube, which not only affect insertion depth but can also scratch sealing surfaces. Residual metal chips inside the tube are even more hazardous, as they may clog narrow passages in instrument tubing, needle valves, and valve assemblies—thus requiring complete removal. 3.
Ensure correct installation orientation for ferrules. Single ferrules, double ferrules, and cut rings all have specific installation directions. Ferrules with cutting edges must be assembled strictly according to the manufacturer's diagrams. Although they can be forced into place if installed in reverse, the ferrule will not properly grip the tube, leading to easy failure and leakage under pressure or vibration.
5. Quick Connect Fittings: Don't Rush for Speed
Quick connect fittings are convenient to install and commonly used in pneumatic systems, low-pressure piping, and locations requiring frequent disassembly. However, they are not simply plug-and-play. Before installation, verify compatibility of the medium, pressure, temperature, and pipe material. Ordinary quick connect fittings must never be used in high-pressure, highly corrosive, hazardous media, or critical safety interlock lines. Prior to assembly, ensure the pipe end is clean, smooth, and free from obvious scratches, oil contamination, or burrs. When inserting the pipe into the fitting, make sure it is fully seated—marking the insertion depth on the pipe beforehand can help. After insertion, gently pull the pipe to confirm that the locking claws have securely engaged. Most leaks in quick connect fittings stem from incomplete insertion or improper pre-treatment of the pipe ends. Never force removal; first cut off the medium supply and depressurize, then press the release mechanism to extract the pipe. Removing under pressure or forcefully pulling out the pipe may scratch the pipe surface and damage internal claws or seals.
6. Several On-site Installation Tips
- Do not install if the pipe cut end is uneven; misalignment causes uneven stress on the ferrule.
- Do not install if burrs remain at the end; burrs can scratch sealing surfaces and debris may clog the line.
- Do not force screw-in if thread specifications are unconfirmed; even if threads mesh, this does not guarantee standard compatibility.
- Do not tighten if ferrule orientation is unclear; incorrect installation direction will inevitably require rework later.
- Do not turn the nut if the pipe has not been fully inserted; wrong engagement position creates potential leakage risks.
- After inserting a quick connect fitting, always pull back to check and confirm proper seating.
- Discard the misconception that "tighter is safer." Proper tightening is sufficient—over-tightening can also cause leaks. Implement comprehensive leak prevention measures.
7. Conclusion
Instrumentation piping fittings may appear simple in structure, but their performance heavily depends on meticulous installation details. Most leakage failures are not sudden incidents but rather hidden issues left during installation—only revealed under pressure, elevated temperature, or vibration.
To achieve high-quality, long-term leak-free piping installations, relying on brute force or a careless "good enough" attitude won’t work. Pay attention to every detail: verify fitting selection, confirm sealing method for threads, clean pipe ends thoroughly, follow correct ferrule installation orientation, ensure full pipe insertion, control tightening angle precisely, and implement complete leak-proof measures. Only then can instrumentation piping fittings operate reliably and avoid various leakage problems.